In the CORE paradigm, software development is structured around units of modularization called concerns. For now, just think of concerns like a container that packages the models of the software you are developing. From this point of view, they are like what other software development IDEs often call projects.
Note: You will learn later how concerns are different from projects, how to reuse concerns of the reusable concern library and how to develop your own concerns.
Modelling Hello World
Note: This page explains how to model a simple HelloWorld from scratch. The tutorial folder contains the finished HelloWorld concern
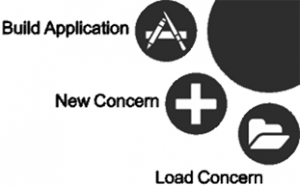
Tap the “New Concern” button on the main menu (the icon showing a “+” shown on Figure 1), and select a (preferably empty) folder in which you wish to store your models. If you don’t have a folder that is empty, tap on the “+” icon to create a new, empty folder in the current folder. The name of the folder will be used as the name of the concern.
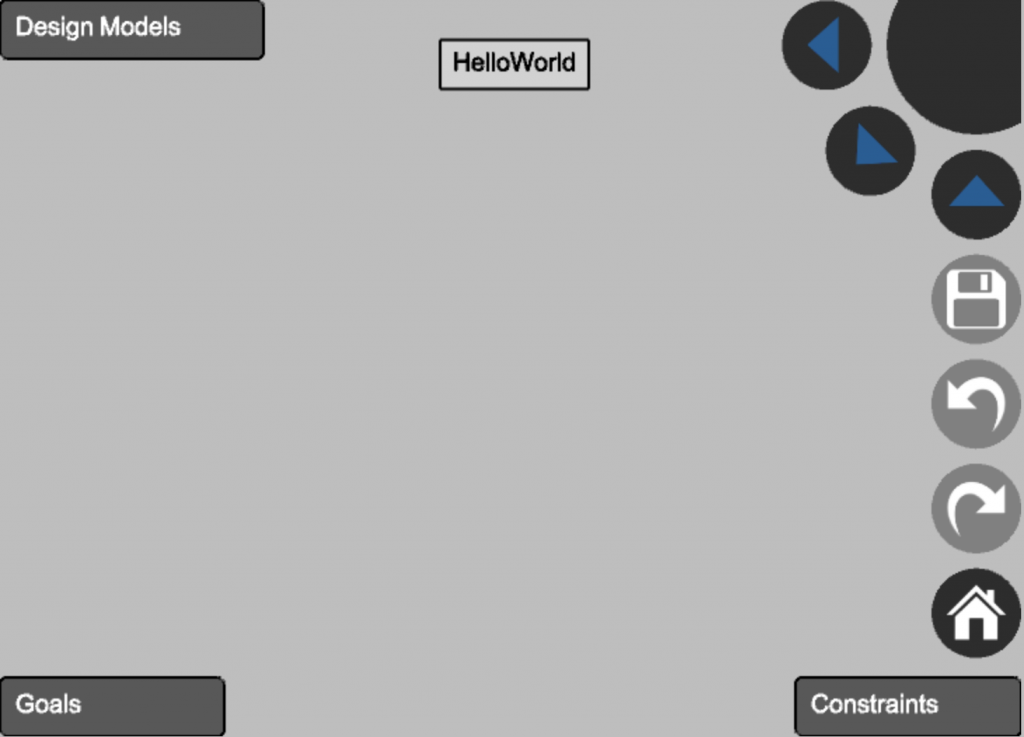
Once you created a concern you are taken to the main view of TouchCORE, the Concern Edit View, shown in Figure 2. The upper center of the view displays the concern’s Feature Model, which for a newly created concern consists of a single, root feature named after the concern’s name (HelloWorld, in our example). In the upper right corner you will find the concern edit menu, in the upper left corner the initially empty list of realization models, in the lower left corner the initially empty list of impacts, and in the bottom right corner the initially empty list of feature dependencies.
Note: If you want to know more about concern-orientated reuse and how to design your own reusable concerns, you are encouraged to now read the page on CORE, and then continue with the page that explains the Concern Edit View in detail. However, if you are using TouchCORE for the first time and your goal is to explore the standard, UML-based software design modelling capabilities of TouchCORE, continue reading on this page.
In TouchCORE, software designs are elaborated with software design models (class, sequence, and (optional) state diagrams). Any model in CORE has to be directly or indirectly attached a feature of a concern. To create a software design model realizing the root feature of your newly created concern, tap-and-hold on the root feature, and from the appearing pop-up menu choose “New Design Model”. TouchCORE will create a new class diagram model for you, give it the same name as the feature (in our case HelloWorld), and switch to the structural design view (equivalent to a design class diagram view). On this view you can now begin creating a class diagram of the concern or application you are developing.
To create a class, draw a rectangle on the grey background (or alternatively tap-and-hold on the background and select “New Class”). Name the class HelloWorld. Tap-and-holding on the classname will give you access to a circular menu from which you can now add attributes and operations to the HelloWorld class (see Figure 3). Tap on “Add operation” (+O icon) to add an operation, and then type “+ void main(String[] args)” to create an operation that can be used as the main method of execution of a Java program (be careful to respect the spacing). Now tap-and-hold on the name of the operation to reveal yet another circular menu, which allows you to set the properties for the operation. In our case, we want to make the operation static by pressing the “Static” button (icon that shows an underlined, capital S).
In order to define behaviour for the operation main, press the button “Go to Message View” (icon that shows a sequence diagram (without a star)). This will open the message view editor, which allows you to define the behaviour of operations using sequence diagrams. Tap-and-hold on the gray rectangle on the target:HelloWorld lifeline and select “Create Statement”. Double-tap on the newly created statement rectangle with the text “Specify statement”, and then type “System.out.println("Hello World")“. Click on the “Back” button (icon showing an X) in the main menu to exit the message view editor and return to the structural view. Click on the “Save” button (disk icon) to save the current design model.
Voila. You created your first CORE design model from which an executable hello world application can be generated. To generate the code, click on the “Generate Code” button (icon looks like a gear), choose “Java”, and then select the folder in which you want the code to be generated.
Hello World with an Object
Since the HelloWorld you created above only uses one class and creates no objects, the class and sequence diagrams of the design are quite uninteresting. In order to use more of the class and sequence diagram capabilities of TouchCORE, we will extend the HelloWorld example to create an object instance. To this aim, create a new class in the structural view, and name it e.g. TextDisplayer. Tap-and-hold on the class name to invoke the class menu, and choose “Add Constructor” (+C icon) to create a constructor for the class. Note: In TouchCORE, constructors are always named create. When generating code, the name of the constructors are changed according to the conventions of the language that is being generated. Next, create an operation + void display(String s).
Now reopen the message view of the main operation of the class HelloWorld (by tap-and-holding on the operation name to open the operation menu and then selecting “Go to MessageView”). Tap-and-hold on the System.out.println statement, and choose “delete”. Now, draw a horizontal line from left to right, starting in the grey rectangle on the target lifeline and ending on the grey background to the right of the target lifeline (the line has to end at least outside of the grey rectangle on the target lifeline in which you started drawing the line). In the displayed popup menu, choose “<<metaclass>> :TextDisplayer”, and then “TextDisplayer.create()” to invoke the constructor that you have previously defined. This creates a constructor call in the sequence diagram, and the reference to the newly created TextDisplayer object is stored in a temporary reference called textdisplayer. Now draw a second line from the target lifeline to the textdisplayer lifeline. Make sure you reach the grey rectangle on the textdisplayer lifeline before releasing your finger/mouse (the textdisplayer:TextDisplayer rectangle lights up in green at that time). From the popup menu, choose your new operation “display(String s)”. Now, on the new message that was created, double-tap on the grey “String s” parameter to provide an actual value for the parameter s. Choose “+” in the following popup to create a new constant, then choose “String” as its type. This creates a default string constant, initially valued “null”. Double-tap it, select “Change Value” and type “Hello World”.
Now, finalize your behavioural design by creating a statement “System.out.println(s)” on the textdisplayer lifeline after the call to display. Alternatively, you can define the behaviour for display within its own message view following the same steps as above.
Once done, tap the back button on the main menu to return to the structural view, and save your model. Feel free to generate the code to check that the design performs as expected.
Where to Go Next
If you are mainly interested in using TouchCORE to elaborate UML design models, you might want to check out the page that explains the structural view editor in detail so that you can create more elaborate class diagrams with attributes, associations, and inheritance. To create complex behavioural designs, read up on the message view editor. These pages also mention the current limitations of TouchCORE with respect to class diagram, sequence diagram and Java support.